Please note that Clarinet does not provide technical support for troubleshooting iPhone POP3 mail setup.
Below please find instructions on how to set up a POP3 mail account on your iPhone, with Clarinet Internet Solutions
1. Add email account on iPhone.
- Go to system “Settings”
- Go to “Mail, Contacts, Calendars”
- Under accounts, touch “Add Account”
- Choose “Other”
- Touch “Add Mail Account”
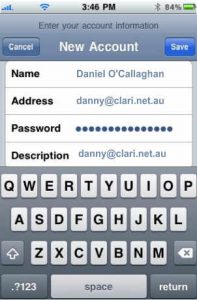
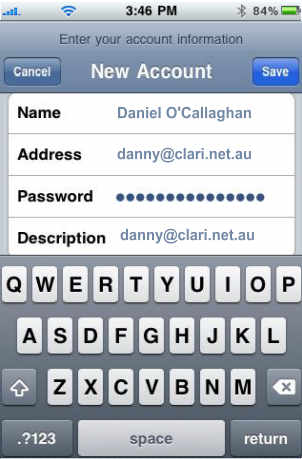
- Enter your account information, using your full email address
- Touch Save
|
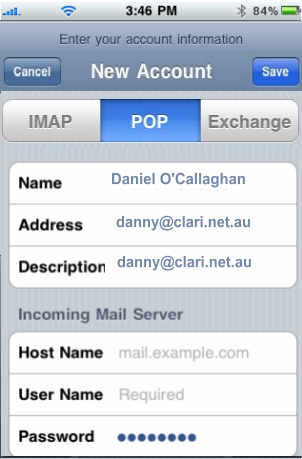
A New Account screen will pop up with options IMAP and POP. IMAP is selected by default.
2. Enter account information.
Select POP and then add the following information: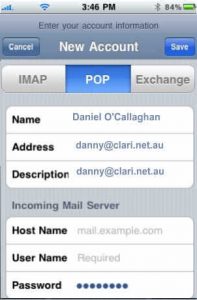 Incoming Mail Server
Host Name: pigeon.clari.net.au
Username: this is the same as your email address
Password: Your e-mail password, not the password for your computer.
Outgoing Mail Server
Host Name: pigeon.clari.net.au
Username: this is the same as your email address
Password: Your e-mail password, not the password for your computer.
Touch Save to save the settings so far and return to the Mail, Contacts, Calendars screen.
Incoming Mail Server
Host Name: pigeon.clari.net.au
Username: this is the same as your email address
Password: Your e-mail password, not the password for your computer.
Outgoing Mail Server
Host Name: pigeon.clari.net.au
Username: this is the same as your email address
Password: Your e-mail password, not the password for your computer.
Touch Save to save the settings so far and return to the Mail, Contacts, Calendars screen. |
3. Complete the setup process in the Advanced section
Touch Your Account and scroll to the bottom, then touch Advanced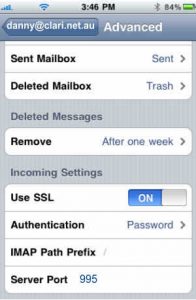 Change the Incoming and Outgoing settings as below.
Incoming Settings
Remove: After one week
Use SSL: On
Authentication: Password
Server Port: 995
After you have done this, tap your account name at the top of the screen, to save the settings and go back to the previous screen.
Change the Incoming and Outgoing settings as below.
Incoming Settings
Remove: After one week
Use SSL: On
Authentication: Password
Server Port: 995
After you have done this, tap your account name at the top of the screen, to save the settings and go back to the previous screen. |
Scroll to the bottom again and tap SMTP
Outgoing Settings
Use SSL: ON
Authentication: Password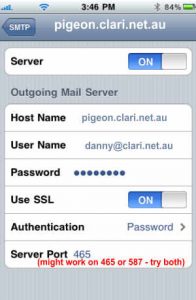 Server Port: 587 (if you have trouble sending messages, try using port 465)
Click SAVE and wait for the iPhone to test your incoming and outgoing mail settings and connect to your mailbox.
Server Port: 587 (if you have trouble sending messages, try using port 465)
Click SAVE and wait for the iPhone to test your incoming and outgoing mail settings and connect to your mailbox. |
 Incoming Mail Server
Host Name: pigeon.clari.net.au
Username: this is the same as your email address
Password: Your e-mail password, not the password for your computer.
Outgoing Mail Server
Host Name: pigeon.clari.net.au
Username: this is the same as your email address
Password: Your e-mail password, not the password for your computer.
Touch Save to save the settings so far and return to the Mail, Contacts, Calendars screen.
Incoming Mail Server
Host Name: pigeon.clari.net.au
Username: this is the same as your email address
Password: Your e-mail password, not the password for your computer.
Outgoing Mail Server
Host Name: pigeon.clari.net.au
Username: this is the same as your email address
Password: Your e-mail password, not the password for your computer.
Touch Save to save the settings so far and return to the Mail, Contacts, Calendars screen. Change the Incoming and Outgoing settings as below.
Incoming Settings
Remove: After one week
Use SSL: On
Authentication: Password
Server Port: 995
After you have done this, tap your account name at the top of the screen, to save the settings and go back to the previous screen.
Change the Incoming and Outgoing settings as below.
Incoming Settings
Remove: After one week
Use SSL: On
Authentication: Password
Server Port: 995
After you have done this, tap your account name at the top of the screen, to save the settings and go back to the previous screen.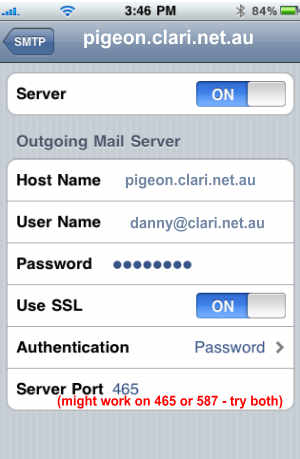 Server Port: 587 (if you have trouble sending messages, try using port 465)
Click SAVE and wait for the iPhone to test your incoming and outgoing mail settings and connect to your mailbox.
Server Port: 587 (if you have trouble sending messages, try using port 465)
Click SAVE and wait for the iPhone to test your incoming and outgoing mail settings and connect to your mailbox.